Transparent Reflecting Sphere
Use this tutorial to create shiny spheres for your interfaces or to enhance your logos and whatnot. Right now it's working in Photoshop 5x, but not guaranteed for Photoshop 6. This tutorial is quite long, and complex; however, every detail is described. If you encounter any problems, try reading it more closely, or take some of my other tutorials, to ge more aquainted with Photoshop. Good luck!
 1
1
Create a new image 400x400 pixels. Make a new layer  and then disable visibility on the Background Layer, by clicking the eye icon next to that layer.
 Using the Elliptical Marquee Tool (shown right), hold down Shift, and create a circular selection, taking up most of the image. Then, select RGB(100,58,9) as the foreground color, and fill the selection by pressing Alt+Backspace. Do not deselect.
Double click on the layer, and name it Sphere Shape.
 2
2
Drag the layer Sphere Shape, onto the new layer button , to duplicate it.
Click on the little eye icon beside the original Sphere Shape layer, to hide it.
Now, to contract the selection by 32 pixels, in the menu go:
Select > Modify > Contract... 16 Pixels
and repeat this one more time.
Feather the selection by pressing Ctrl+Alt+D, by 25 pixels.
Now clear the selection by pressing Delete, and then deselect Ctrl+D.
 3
3
Make a copy of the layer Sphere Shape Copy, by dragging it onto the new layer button, . Double click on the new layer, and rename it Glow.
Click on Preserve Transparency. Or if you're using Photoshop 6+, Lock Transparent Pixels.

Select White as the foreground color, and then fill the layer by pressing Alt+Backspace.
Set the blending mode to Color Dodge, and the layer Opacity to 70%.
 4
4
Holding down Ctrl, click on the original Sphere Shape layer, to select it's transparency. Create a new
Layer , double click and rename it Shadow, then choose Black as the foreground color.
On the new layer, fill the selection with black Alt+Backspace, and then choose the Marquee Tool  . Drag the selection up and to the left, about 60 pixels.
Press Ctrl+Alt+D to feather the selection by 40 pixels, and then clear the selection by pressing Delete.
Deselect Ctrl+D.
 5
5
Set the Opacity of the layer Shadow to 60%, and then drag it onto the new layer button , to make a copy of it.
Set the new layer's Opacity to 15%, and the blending mode to Color Burn.
 6
6
Holding down Ctrl, click on the original Sphere Shape layer, near the bottom of the layers. Now, create a new layer on the very top, and rename it Highlight.
Select Black as the foreground color, and fill the selection Alt+Backspace. Set the layer's blending mode to Screen, and deselect Ctrl+D.
Change the layer's Opacity to 60%.
 7
7
Filter > Render > Lighting Effects...
Change the light to an Omni, and put it's intensity to 100. Position the light in the upper-left area of the sphere, by dragging it's center, and enlarge the radius by pulling on the outer dots.
Change the Material Properties to:
Gloss: 100
Material: -100
Ambience: 0
Exposure: 0
Press OK to render the lighting effects, and then go:
Image > Adjust > Auto Levels
 8
8
Make a copy of the layer Highlight, and set the blending mode of the new layer to Color Dodge, and the opacity to 50%.
Your image will look similar to what is seen on the left. It's shiny and transparent, but not yet reflective.
 |
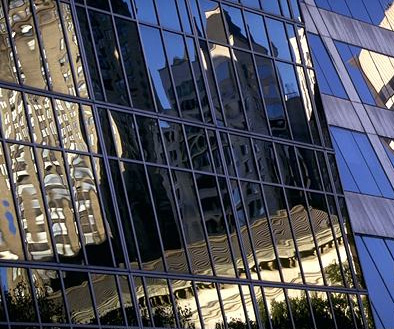
Click here to download the reflecting image, save it to your desktop, and then open it in Photoshop. |
Open the image of the reflecting buildings, and press
Ctrl+A to select the entire image, and then
Ctrl+C to copy it. Now, go back to the sphere document.
 9
9
Holding down Ctrl, click on the layer Highlight, to select it's transparency. Now,
Edit > Paste Into
This will create a new layer, and use the selection as a mask for the building image. Double click on the new layer and rename it Reflection.
If the building image is too small for your sphere, click on the little image part of the layer, and press Ctrl+T on the keyboard, and resize the layer so it fits. Double click in the center to accept new size values.
 10
10
On the Reflection layer, click on the thumbnail of the building image so that a small brush appears in the box
beside it.
Next, holding down Ctrl, click on the little white circle to the right of the layer thumbnail, to select the layer mask.
Filter > Distort > Sphereize... 100%
Now, deselect Ctrl+D, and set the layer's transparency to 30%, and the blending mode to Color Dodge.
 Now that you have completed the sphere, use it in your interfaces, or other imagery.
If you got lost, or you need a guide for this tutorial, click here to download the .psd file
(848 Kb).
See the eyeball I created with this tutorial!
 Tips
Tips
a) To make text, or a logo appear inside the sphere, place the object in the center of the sphere. Holding down Ctrl, click on the Highlight layer, to select it's transparency. Filter > Distort > Sphereize... and then change the blending mode to Color Dodge, and adjust it's transparency to reach the desired effect.
b) To change the color of the sphere, click on the layer Sphere Shape copy, and enable Preserve Transparency (Lock Transparent Pixels). Fill the layer Alt+Backspace with a dark color of your choice.
c) To make the sphere not transparent, or have a different color in the center, click on the original Sphere Shape layer, to unhide it, and select Preserve Transparency (Lock Transparent Pixels). Fill it with the color of your choice.